 International
 Singapore
 Malaysia
 Thailand
 Vietnam
Your shopping cart is empty!

RPi Pico W - Control LED, Monitor Temperature via WebServer
- Abdulrahman Alhamed
- 26 Nov 2022
- 3190
Raspberry Pi Pico W is a new Raspberry Pi product that adds a WiFi feature to the Raspberry Pi Pico, which allows you to connect the device to a WiFi network. In this tutorial, we will learn how to connect Raspberry Pi Pico W to a WiFi network and turn it into a web server to control digital outputs from a browser and receive temperature sensor data
Video Tutorial
Hardware Preparation
Software Preparation
This is the summary of the steps. For more details, please refer to the video.
- Download and install Thonny Python IDE from: thonny.org
- Download the latest version of Raspberry Pi Pico W firmware at https://rpf.io/pico-w-firmware
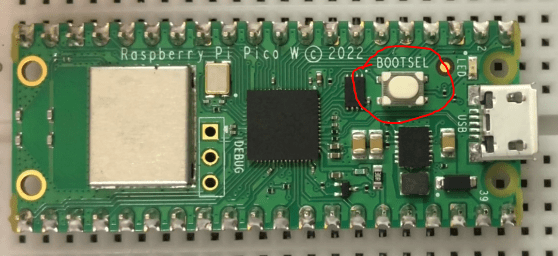
- To install the firmware, connect the USB cable to your computer, hold down the BOOTSEL button on your Raspberry Pi Pico W, then connect the small end of your micro USB cable to the Raspberry Pi Pico W.
- On Your computer, drag and drop the firmware file you downloaded into the Raspberry Pi Pico W file manager. Your Raspberry Pi Pico should disconnect and the file manager will close.
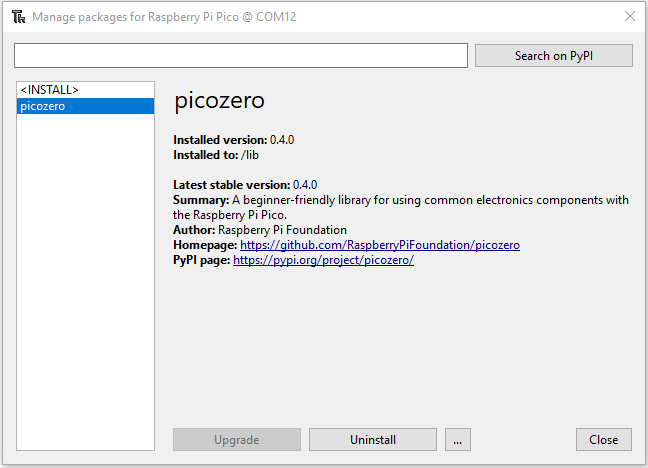
- Open the Thonny editor, choose Tools > Manage packages. In the pop-up ‘Manage packages for Raspberry Pi Pico’ window, type “picozero” and click Search on PyPi. Click on picozero in the search results. Click on Install.
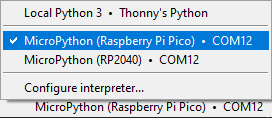
- In Thonny, look at the bottom right-hand corner, it will show you the version of Python that is being used, click on the text and select ‘MicroPython (Raspberry Pi Pico)’ from the options.
Now you are all set do to the coding.
Code
import network
import socket
from time import sleep
from picozero import pico_temp_sensor, pico_led
import machine
ssid = 'NAME OF YOUR WIFI NETWORK'
password = 'YOUR SECRET PASSWORD'
def connect():
#Connect to WLAN
wlan = network.WLAN(network.STA_IF)
wlan.active(True)
wlan.connect(ssid, password)
while wlan.isconnected() == False:
print('Waiting for connection...')
sleep(1)
ip = wlan.ifconfig()[0]
print(f'Connected on {ip}')
return ip
def open_socket(ip):
# Open a socket
address = (ip, 80)
connection = socket.socket()
connection.bind(address)
connection.listen(1)
return connection
def webpage(temperature, state):
#Template HTML
html = f"""
<!DOCTYPE html>
<html>
<form action="./lighton">
<input type="submit" value="Light on" />
</form>
<form action="./lightoff">
<input type="submit" value="Light off" />
</form>
<p>LED is {state}</p>
<p>Temperature is {temperature}</p>
</body>
</html>
"""
return str(html)
def serve(connection):
#Start a web server
state = 'OFF'
pico_led.off()
temperature = 0
while True:
client = connection.accept()[0]
request = client.recv(1024)
request = str(request)
try:
request = request.split()[1]
except IndexError:
pass
if request == '/lighton?':
pico_led.on()
state = 'ON'
elif request =='/lightoff?':
pico_led.off()
state = 'OFF'
temperature = pico_temp_sensor.temp
html = webpage(temperature, state)
client.send(html)
client.close()
try:
ip = connect()
connection = open_socket(ip)
serve(connection)
except KeyboardInterrupt:
machine.reset()
Project Complete
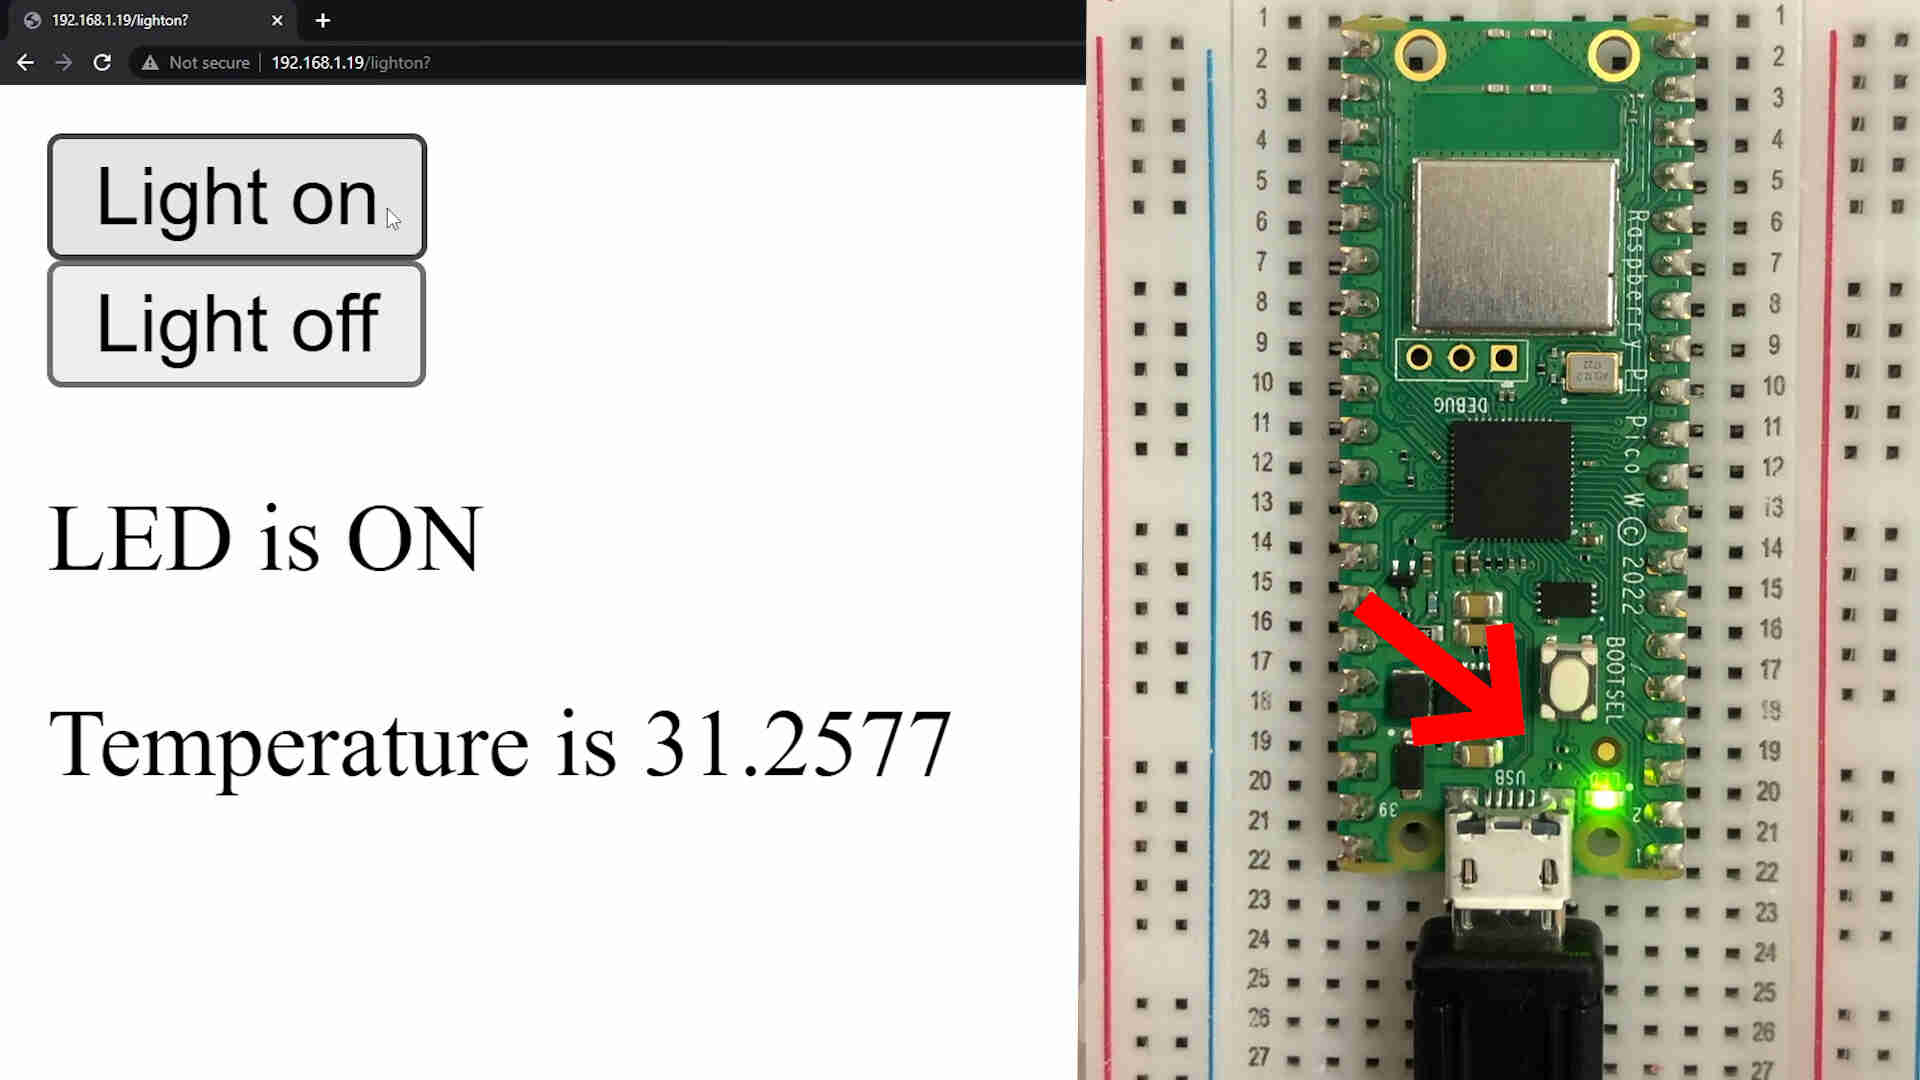
After you run the program, an IP address will be displayed on your shell window, copy and paste it into the web browser. Now you can control the onboard LED using the buttons, and monitor the temperature.