 International
 Singapore
 Malaysia
 Thailand
 Vietnam
Your shopping cart is empty!

Line Following Robot using Scratch in Raspberry Pi 5
- Soren Kumar
- 23 Jun 2024
- Tutorial
- Beginner
- 94
In this tutorial, you will learn how to use Scratch programming for a Line Following Robot using Raspberry Pi 5, Maker Line, and Maker Drive with 2WD Smart Robot Car Chassis. This tutorial is designed for beginners who are learning to use Raspberry Pi 5 and want to create a simple line-following robot with Scratch code.
Video Tutorial
To Build the Code
To create a Scratch program for Raspberry Pi, begin by powering up the Raspberry Pi 5 and launching Scratch 3. Next, incorporate the Raspberry Pi GPIO extension. The coding process is straightforward, utilizing "IF" and "ELSE" logic. When the Maker Line GPIO pin is activated, the Scratch code employs "IF, ELSE" logic to determine the GPIO pin to activate for the Maker Drive.

To power the Raspberry Pi 5, connect a pair of 3.7V 2000mAH Li-Ion batteries to the Maker Drive, then to the Raspberry Pi 5, and finally to the Maker Line.
Then Connect the Rasspberry PI 5 in Headless Mode by using VNC.
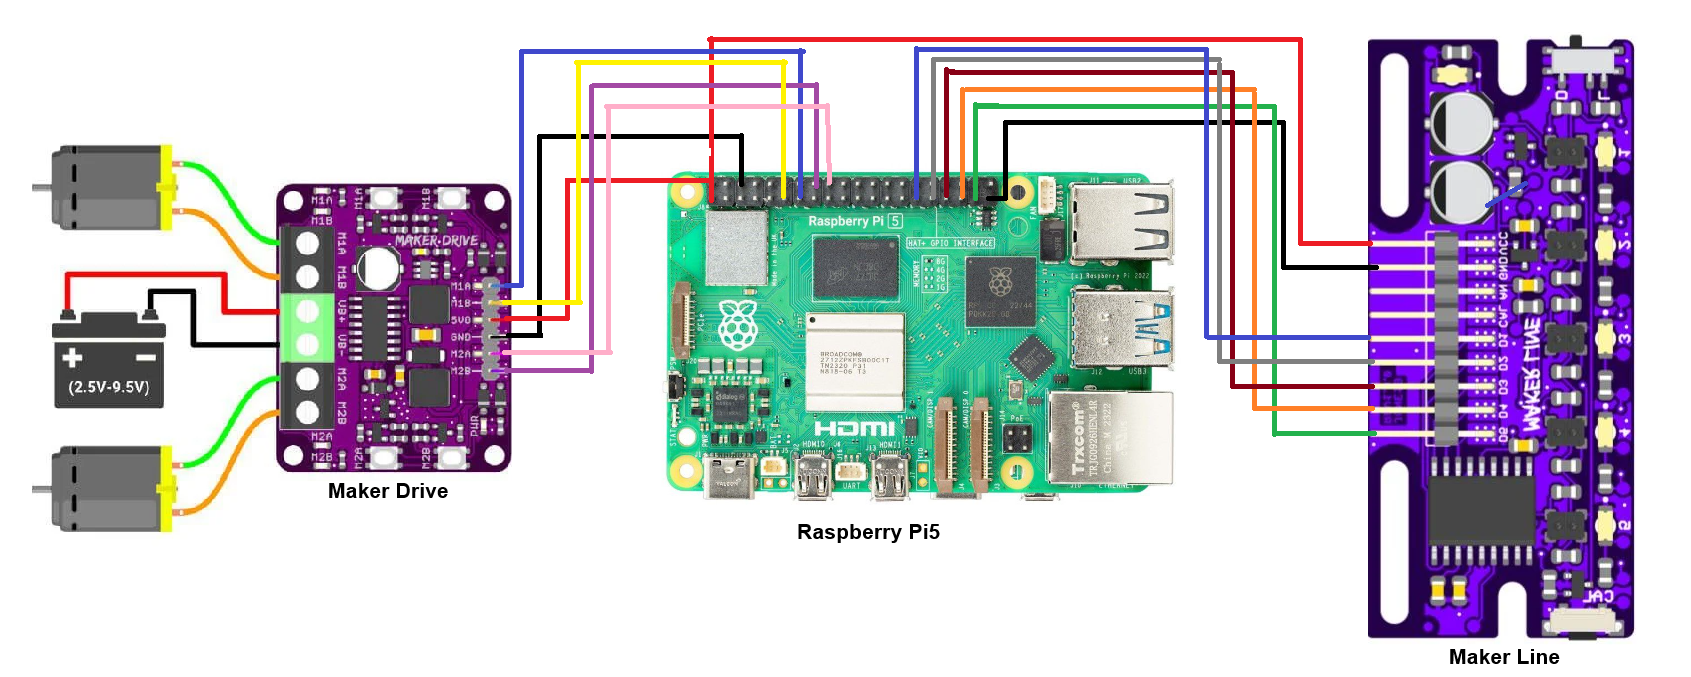
The schematic diagram for lining up the components for the robot to build the circuit.
Hardware Components

2x18650 Battery Holder
$0.45 $0.45
x 1 unit(s)
 Backorder Only
2WD Smart Robot Car Chassis
$4.48 $4.48
x 1 unit(s)

3.7V 2000mAh Li-Ion Battery
$2.45 $2.45
x 2 unit(s)
 Best Seller
x 1 unit(s)

Maker Line: Simplifying Line Sensor For Beginner
$10.90 $10.90
x 1 unit(s)

Raspberry Pi 5 Computer with 4GB RAM
$66.00 $66.00
x 1 unit(s)