 International
 Singapore
 Malaysia
 Thailand
 Vietnam
Your shopping cart is empty!

In-Depth Review Raspberry Pi 5 Argon NEO 5 Case
- Asri Ruslan
- 23 Jul 2024
- News
- 289
1. Introduction
The Raspberry Pi 5 has been making waves in the tech community with its enhanced performance and new features. To complement this powerhouse, Argon has released the NEO 5 case, designed to offer superior thermal performance and M.2 NVMe support. In this review, we’ll delve into the installation process, thermal management capabilities, and NVMe speed of the Argon NEO 5 case.
2. Unboxing and Components
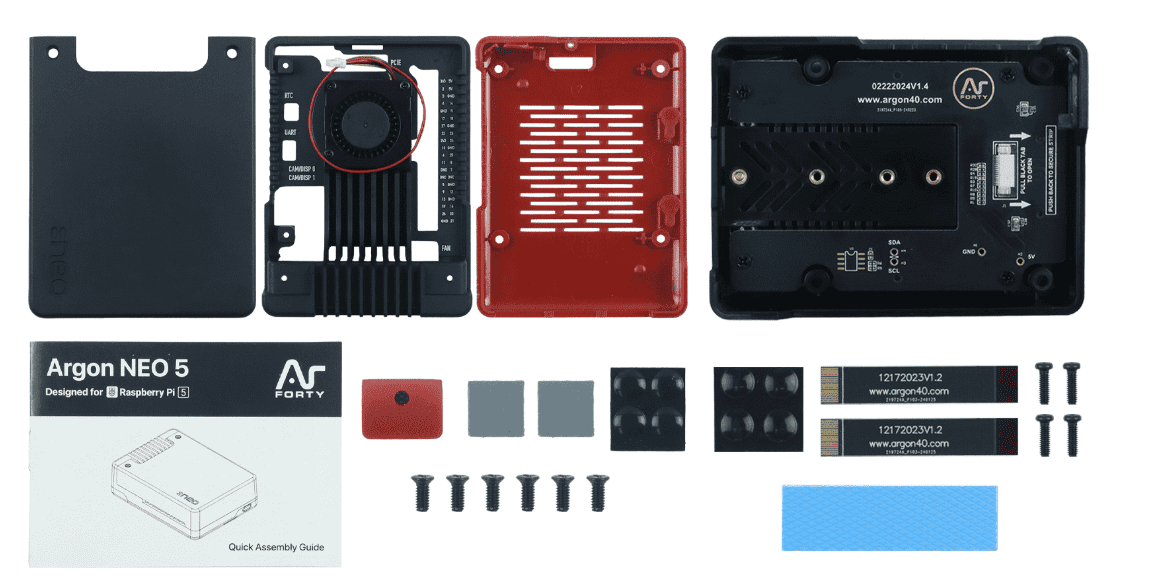
The Argon NEO 5 case comes well-packaged, including:
- Aluminum top cover
- Aluminum heatsink with Active cooler
- Plastic bottom shell
- NVMe M.2 adapter with heatsink
- Thermal pads for CPU, PMIC, RAM, RP1 chip & NVMe SSD
- 4 Pcs M2.5 screws for M.2 base
- 2 Pcs M2.5 screws for top cover
- 4 Pcs M2.5 screws for M.2 adapter heatsink
- 2 set footer
- Instruction manual
3. Assembly Process
- Preparation: Begin by ensuring you have all components. The instruction manual provides clear, step-by-step guidance.
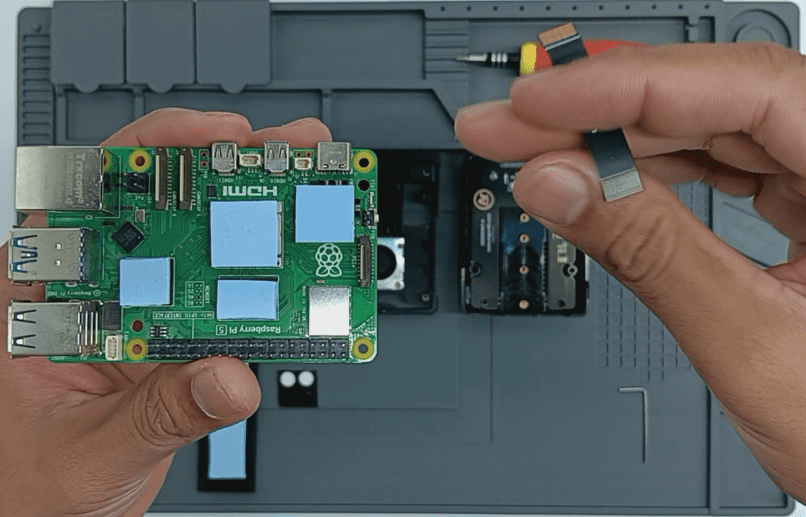
- Thermal Pads: Apply the thermal pads to the designated spots on the Raspberry Pi 5. These are crucial for efficient heat dissipation.
Note: Here I'm using a 3rd party thermal pads.
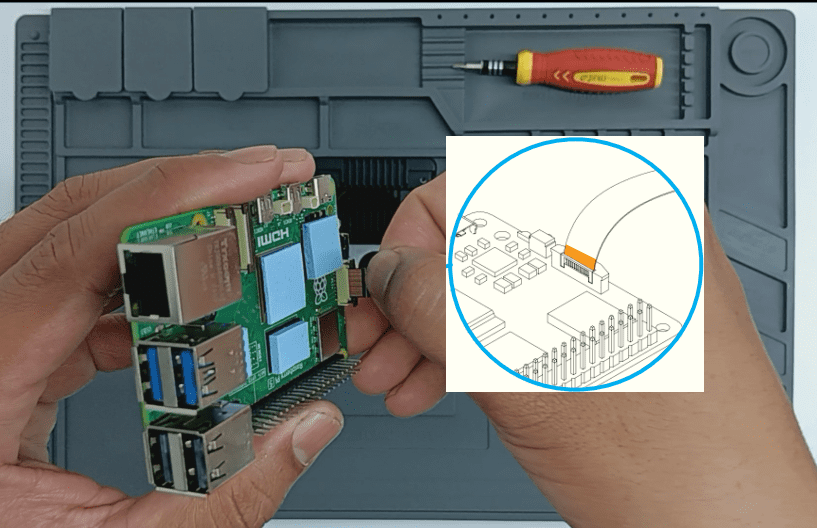
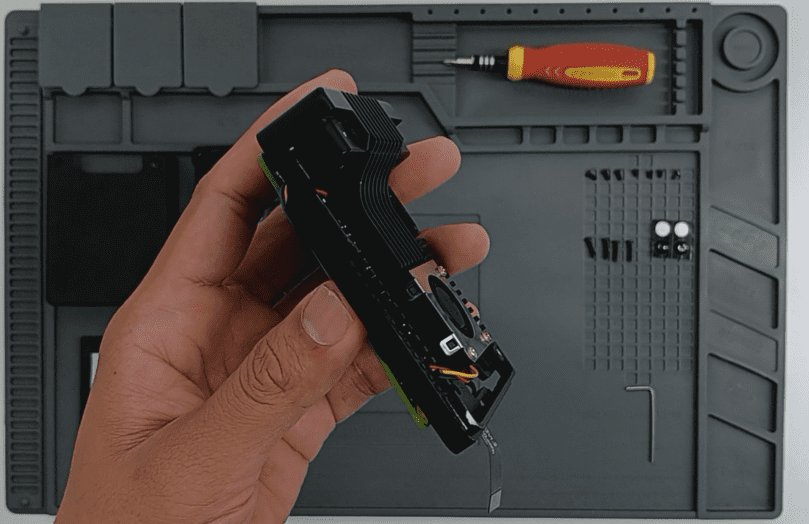
- PCIe FFC: Connect the PCIe Flat Flex Cable (FFC) to the Raspberry Pi PCIe port. Ensure the cable are in the correct orientation than lock the cable.
- Fan Connector: Install the fan connector to the Raspberry Pi 5 & route the cable using the provided guide rail.
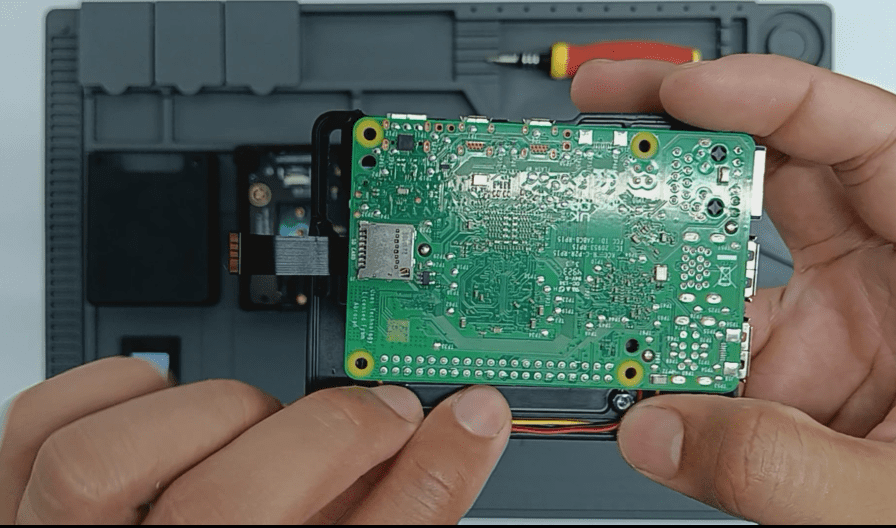
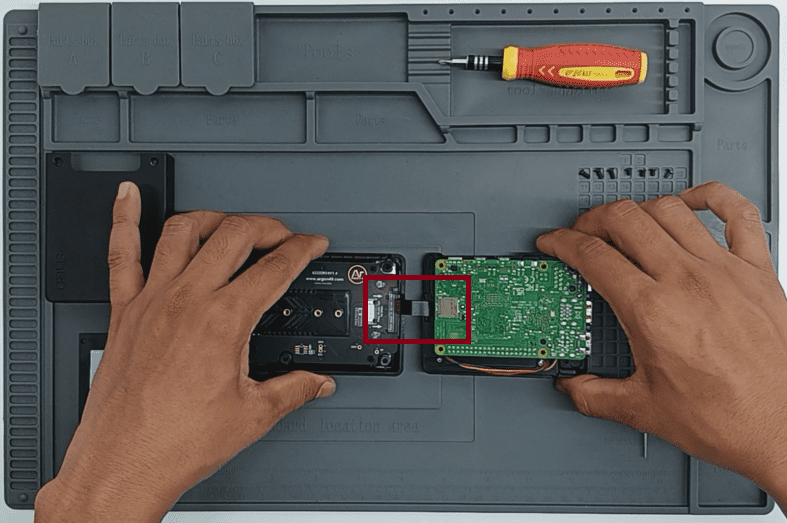
- Inserting the Raspberry Pi 5: Place the Raspberry Pi 5 into the middle part of the case.
- NVMe Adapter: Align it with the mounting points connect the adapter to the Raspberry Pi 5 and secure the NVMe drive in place with the provided screws.
- NVMe: Install your M.2 NVMe SSD. Depending on the NVMe form factor, you may change the position of the screw.
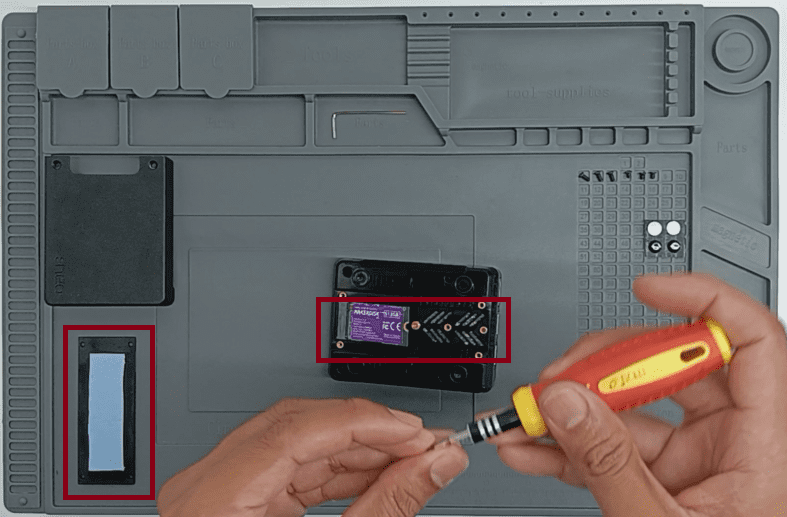
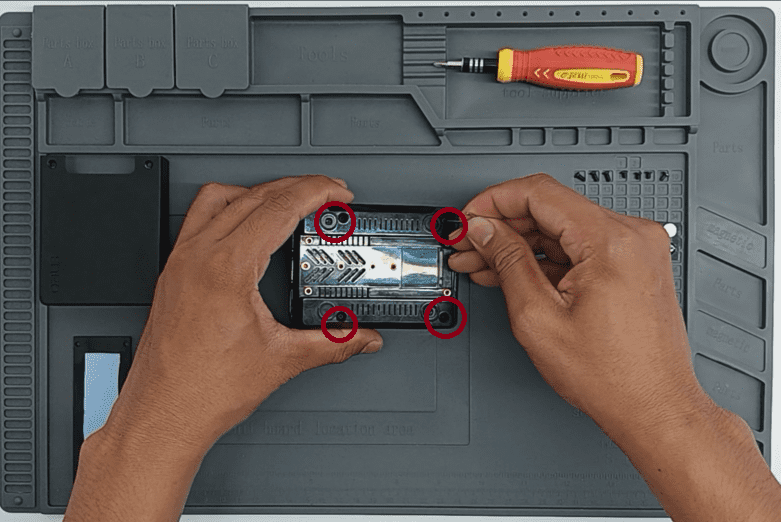
- NVMe Heatsink: Place the thermal pad into the heatsink (M.2 cover) and screw it in place.

- Final Assembly: Place the aluminum top cover over the setup and secure it with the provided screws. Then install the rubber footer.

4. Testing Methodology
To provide a thorough evaluation of the Argon NEO 5 case, we conducted a series of tests focusing on thermal performance and NVMe speed. Our testing methodology is detailed below:
System update
All systems were updated to the latest available version.
Thermal Performance Testing (CPU)
Room Temperature: We measured the room temperature by using the MCP9700 sensor.
- Idle Temperature: We measured the Raspberry Pi 5’s temperature after 10 minutes of idling to establish a baseline.
- Stress Test: Using stress-testing software (stressberry), we runs the test for 1800 seconds (30 Minutes) with 300 seconds (5 Minutes) idle period before and after the test.
- Ambient Temperature: All tests were conducted in a controlled environment with an average ambient temperature of 26°C (78.8°F) measured by using the MCP9700 sensor.
4.1 Thermal Performance
4.1.1 Design and Materials
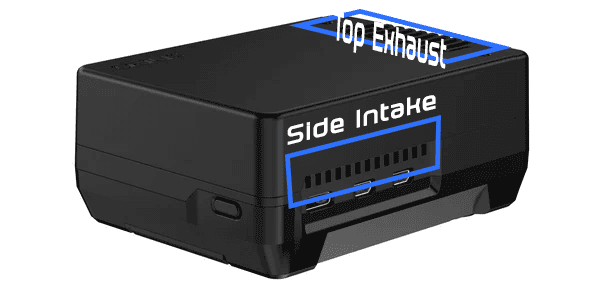
The Argon NEO 5 case is constructed with an aluminum heatsink, with a 30mm blower type fan. The case provides ventilation for the intake and exhaust airflow.
4.1.2 Temperature Testing
We conducted temperature tests under various conditions:
- Idle State: With minimal activity, the Raspberry Pi 5 maintained a temperature of around 50-53°C.
- Moderate Load: Running typical applications, the temperature hovered around 60°C.
- Stress Test: During intensive tasks like running stressberry test, the temperature peaked at 75°C.
4.1.3 Stressberry
Analysis of Stressberry Test Results
Overview
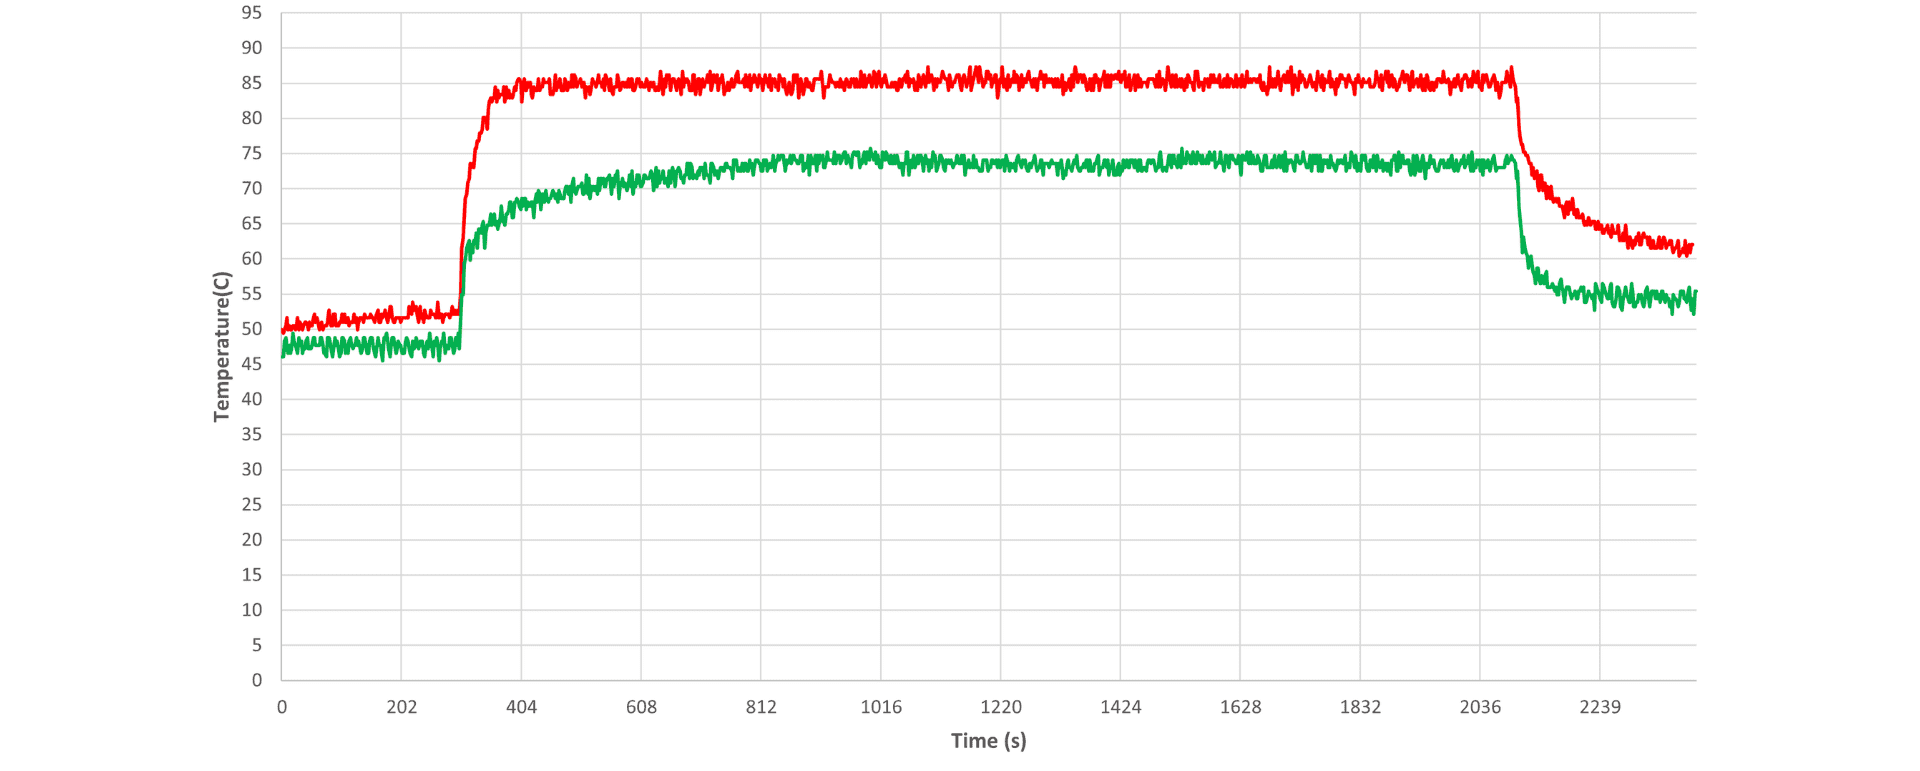
The graph shows temperature data over time for two configurations of the Raspberry Pi 5:
- Red Line: Raspberry Pi 5 without an active cooler (barebone).
- Green Line: Raspberry Pi 5 with the Argon NEO 5 case.
Key Observations
- Initial Idle Period (0-300 seconds):
- Red Line (Barebone): Temperature starts at around 50°C.
- Green Line (Argon NEO 5): Temperature starts lower at around 45°C.
- Analysis: The Argon NEO 5 case provides better passive cooling during idle, as evidenced by the lower starting temperature.
- Stress Test (300-2100 seconds):
- Red Line (Barebone): Temperature rises sharply and stabilizes around 85°C.
- Green Line (Argon NEO 5): Temperature increases but stabilizes at a significantly lower temperature of around 65°C.
- Analysis: During the stress test, the Argon NEO 5 case with active cooling is far more effective at dissipating heat, maintaining a much lower temperature compared to the barebone setup. This suggests improved thermal management, which can prevent thermal throttling and maintain performance.
- Post-Test Cool Down (2100-2400 seconds):
- Red Line (Barebone): Temperature decreases gradually, reaching around 65°C.
- Green Line (Argon NEO 5): Temperature drops more quickly, stabilizing around 50°C.
- Analysis: The cooling period demonstrates the effectiveness of the Argon NEO 5 case in rapidly bringing the temperature down after the stress test. The active cooling system in the case aids in quicker heat dissipation compared to the passive cooling of the barebone setup.
The stressberry test results clearly indicate that the Argon NEO 5 case provides superior thermal performance for the Raspberry Pi 5:
- Lower Idle Temperatures: The Argon NEO 5 case starts with a lower temperature during idle.
- Effective Cooling Under Load: During the stress test, the temperature difference between the two setups is substantial, with the Argon NEO 5 case maintaining much lower temperatures.
- Rapid Post-Test Cooling: The Argon NEO 5 case cools down the Raspberry Pi 5 more quickly after the test, demonstrating efficient heat dissipation.
Overall, the Argon NEO 5 case significantly enhances the thermal management of the Raspberry Pi 5, making it a valuable accessory for those looking to maximize performance and longevity of their device under heavy workloads.
4.2 NVMe Speed Testing
- Installation and Setup: We installed an NVMe M.2 SSD using the provided adapter and applied the thermal pad with the M.2 heatsink that also act as a cover. All components was properly seated.
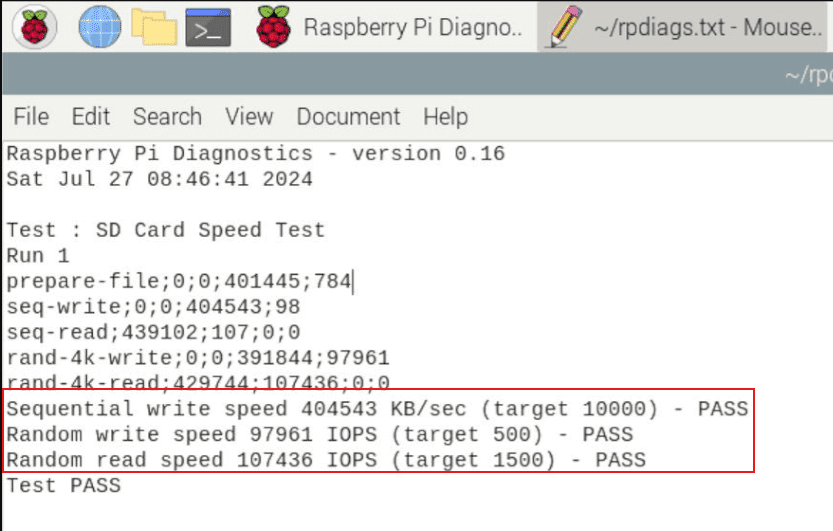
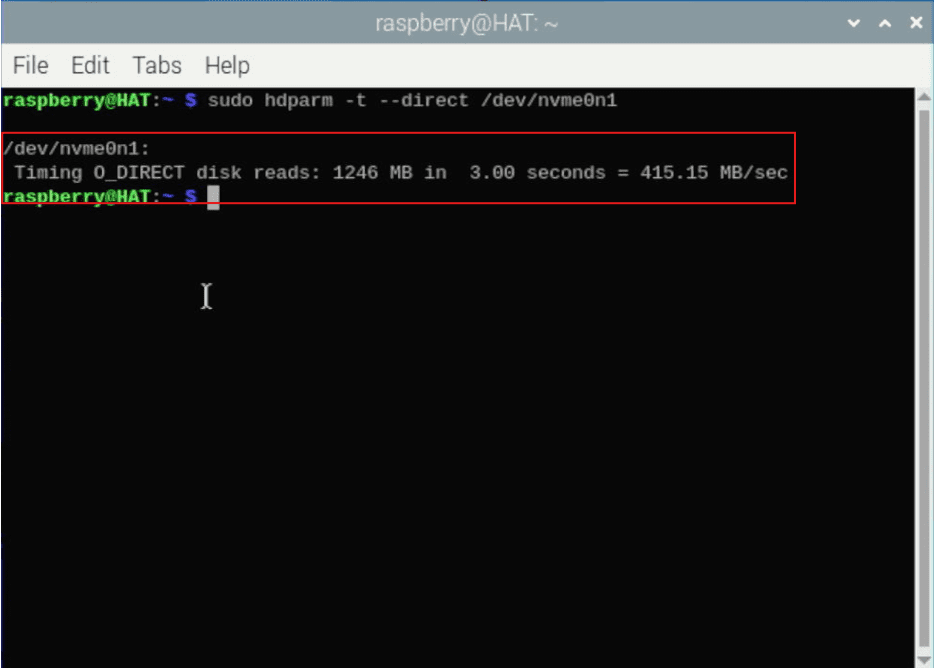
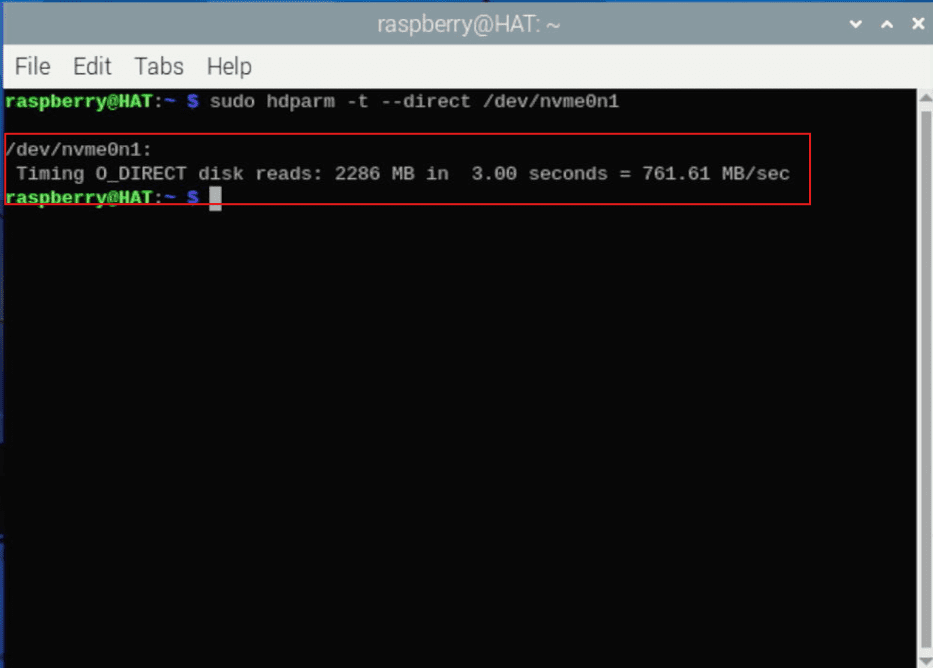
- Benchmarking Tools: We used popular benchmarking tools such as hdparm to measure sequential and random read/write speeds.
- Test Scenarios: We performed multiple tests runs under different scenarios:
- Cold Boot: NVMe speed tested immediately after booting up.
- Application Launch: We tested NVMe speed while launching resource-intensive applications such as a web browser.
- File Transfer: We measured NVMe performance during large file transfers to simulate real-world usage.
- Data Collection and Analysis: We collected data from multiple runs to ensure consistency and accuracy, averaging the results to provide reliable performance metrics.
PCIe Gen 2
PCIe Gen 3
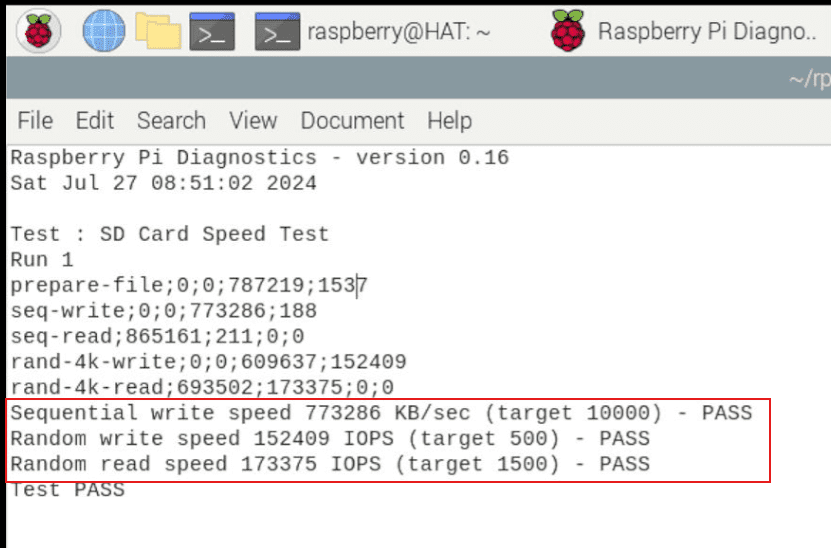
Results Analysis
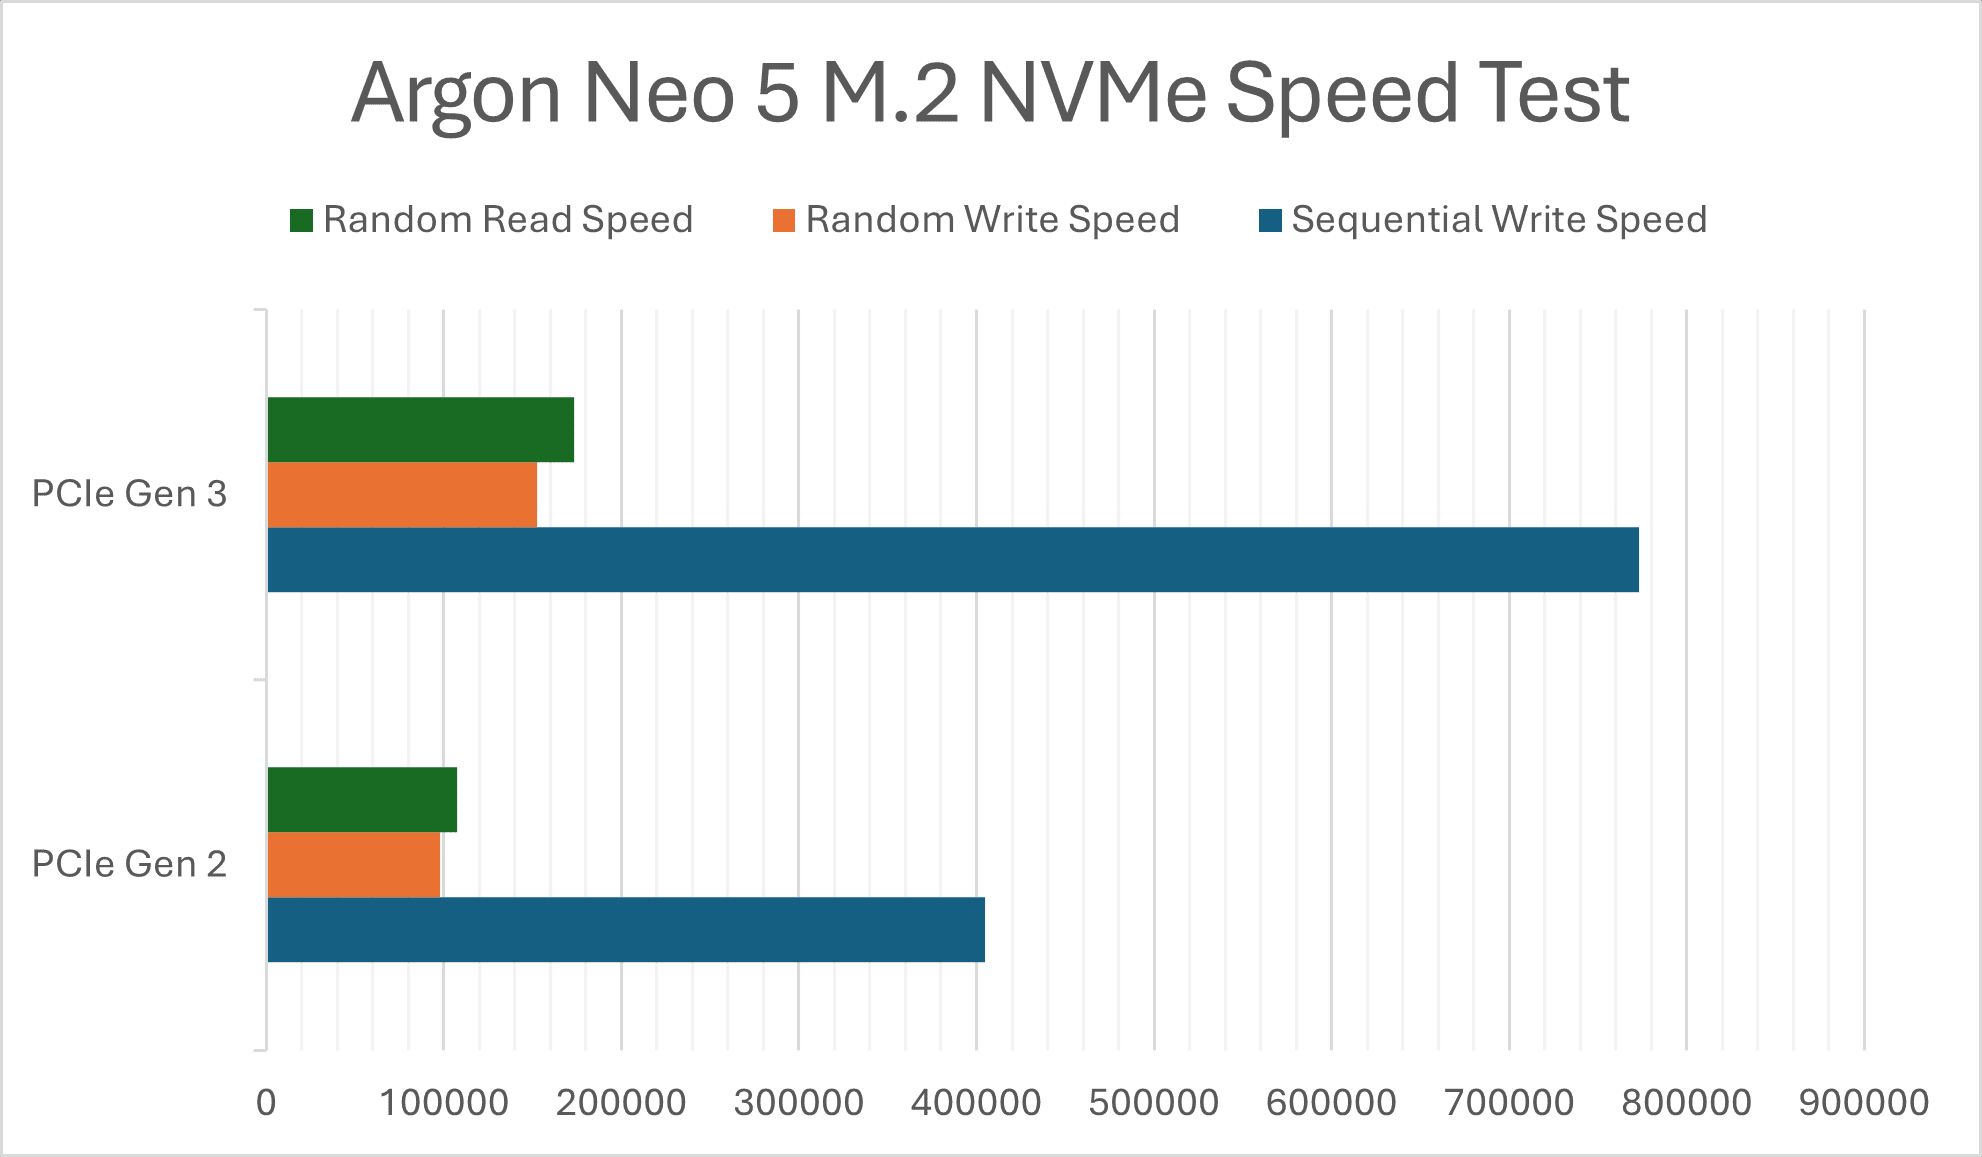
- Sequential Write Speed: The NVMe drive's sequential write speed nearly doubled when moving from PCIe Gen 2 to PCIe Gen 3, demonstrating a significant improvement in data transfer rates.
- Random Write and Read Speeds: Both random write and read speeds saw substantial increases with PCIe Gen 3, indicating better performance for tasks involving numerous small data transactions.
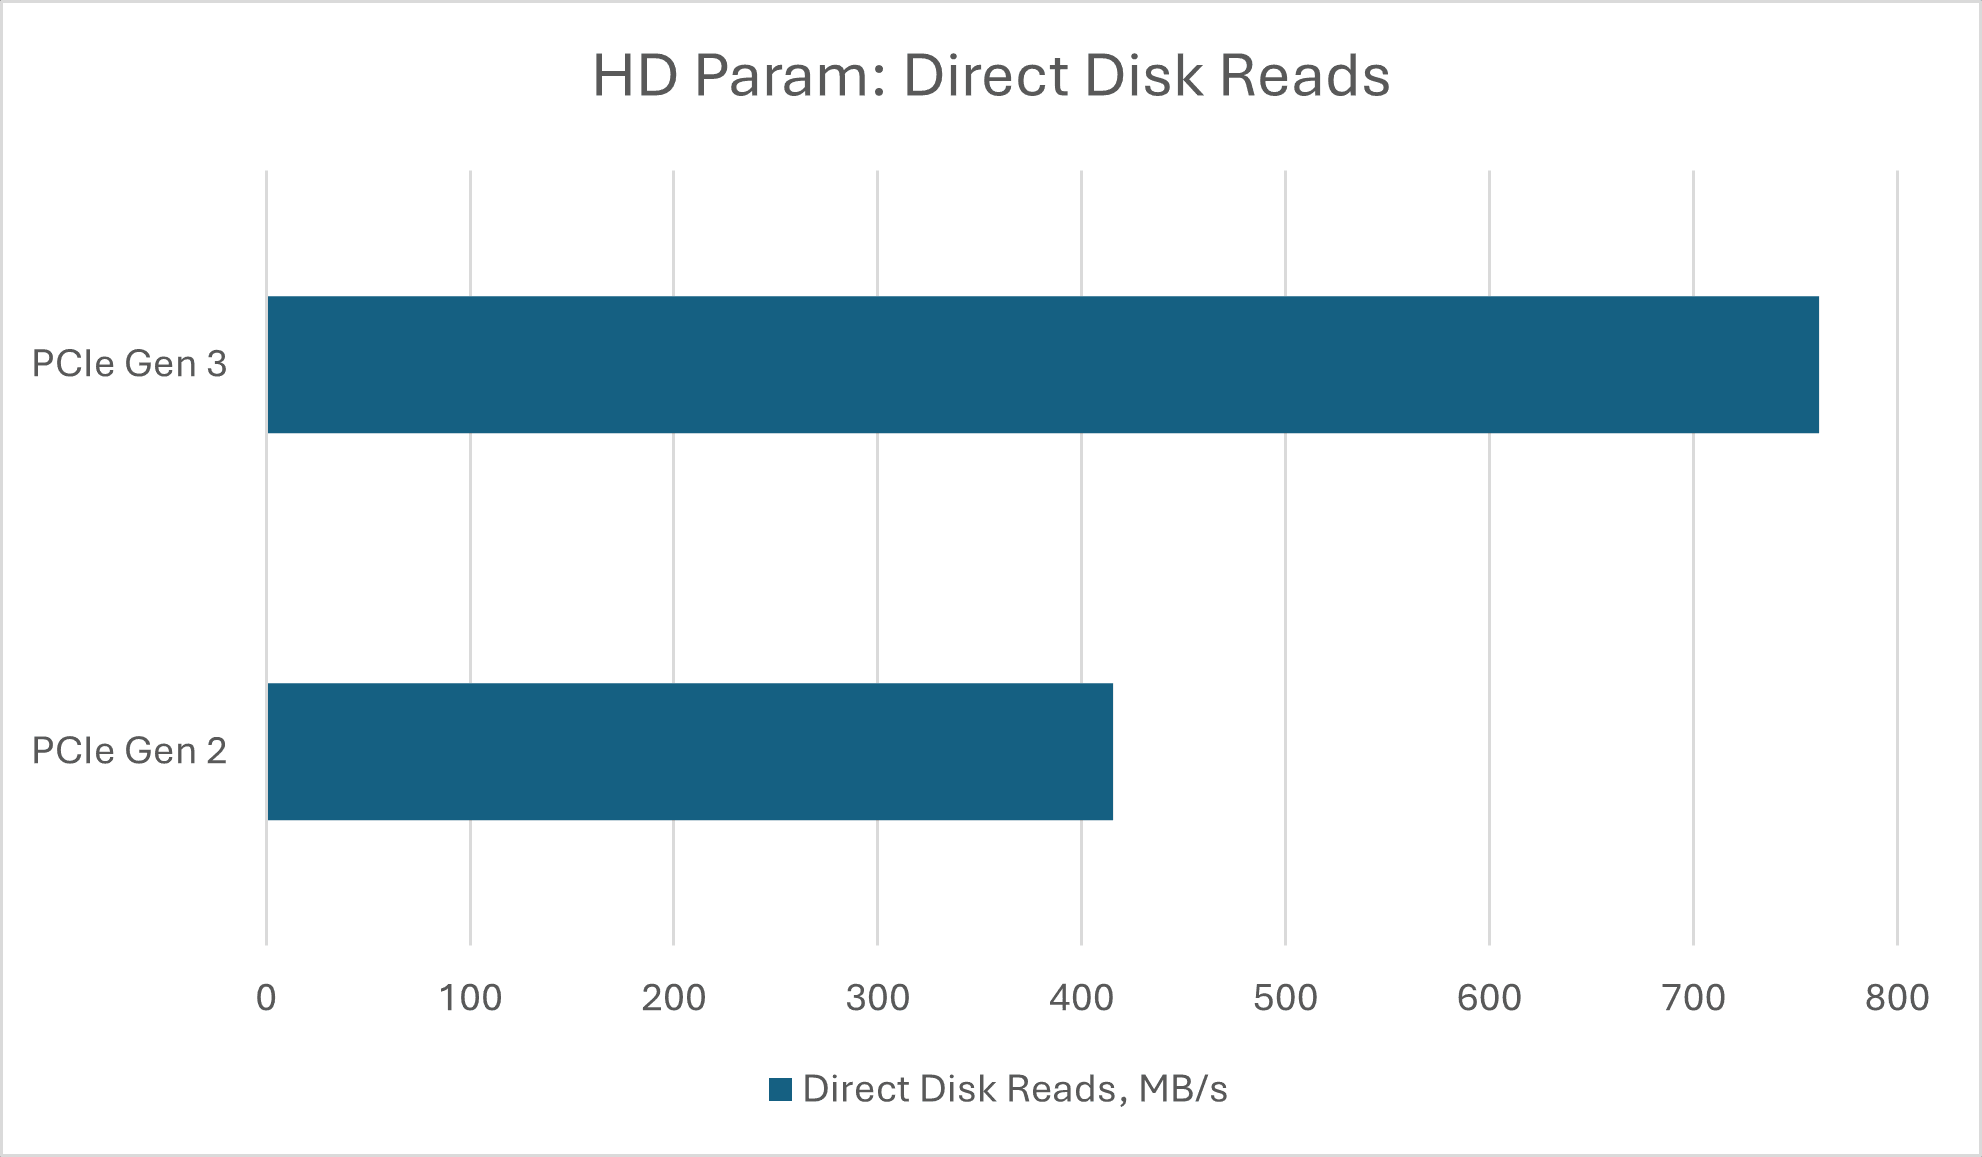
- Direct Disk Reads (hdparm): The direct disk read speed, as measured by hdparm, also showed a notable improvement, with the PCIe Gen 3 interface providing almost double the read speed compared to PCIe Gen 2.
These results highlight the performance benefits of using PCIe Gen 3 with the Raspberry Pi 5, especially for tasks that require high data transfer rates and efficient handling of random read/write operations.
5.0 Final Thoughts
The Argon NEO 5 case offers excellent thermal management, NVMe support, and a sleek design, making it a top choice for enhancing the Raspberry Pi 5's performance. One unique feature is the placement of the M.2 adapter on the bottom, which allows for better intake fan ventilation compared to other M.2 HATs on the market. This design choice significantly improves airflow and cooling efficiency. However, the higher cost and some minor accessibility issues may be points to consider depending on your specific needs and usage scenarios. Overall, it is a well-designed and highly functional case that brings out the best in the Raspberry Pi 5.
Related Products

Argon NEO 5 M.2 NVMe PCIe Case for Raspberry Pi 5
$22.25++ $22.25
x 1 unit(s)