 International
 Singapore
 Malaysia
 Thailand
 Vietnam
Your shopping cart is empty!

DIY Piano Paper With Raspberry Pi Pico
- Abdulrahman Alhamed
- 22 Jul 2023
- Tutorial
- Beginner
- 869
Ever wondered if a piece of paper can turn into a touch-sensitive piano? In this exciting DIY tutorial, we'll show you exactly how to transform a simple sheet of paper into a fully functional touch-sensitive piano using the Raspberry Pi Pico!
Video Tutorial
Components Required
Hardware Components
 -31%
-31%40 Ways Male to Male Jumper Wire
$0.63 $0.90 $0.63
x 1 unit(s)
 Best Seller
Maker Pi Pico & Kits: Simplifying Raspberry...
$9.00++ $9.00
x 1 unit(s)
Get Familiar with Thonny and CircuitPython
In this tutorial, we'll use Thonny editor & CircuitPython to build the code for this project. If you're not familiar with Thonny, check out the video below to learn how to get started with it.
Code
Visit the official CircuitPython website and download the latest library bundle. Make sure to select the correct bundle for your version of CircuitPython.
Unzip the file, and locate this library.
- neopixel.mpy
- simpleio.mpy
Copy and paste them into "lib" folder on your CIRCUITPY drive.
Project complete
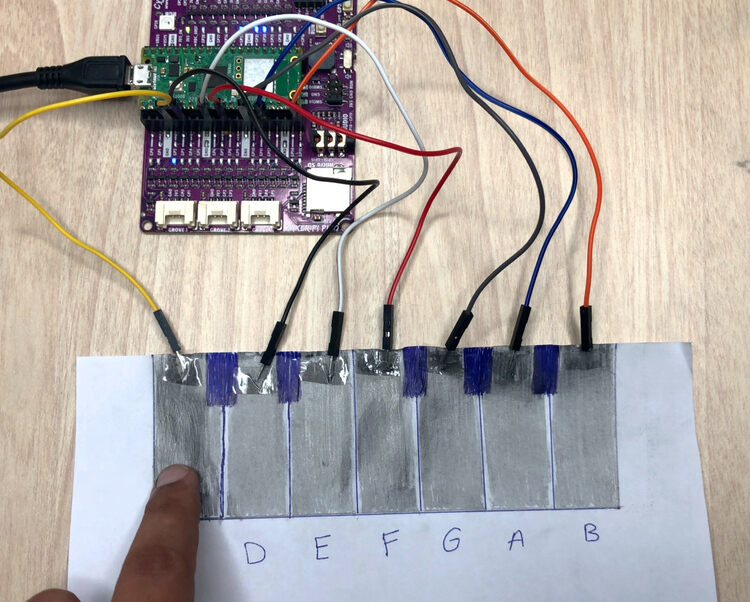
Take a sheet of paper and draw a piano keyboard using a pencil. Stick jumper wires on the keys using tape or blu tack. Your magical Piano Paper is all set!